Back to Amazon.com

Brooklyn Brew Shop Bubbly Sparkling Wine Gift Pack - Making Kit & 5 Glass Bottles

Sold by: Wine Country Connect, LLC

New
Limit 10 per customer
Sold Out
You missed it! But Today's Woot is waiting!

Want more great deals? Sign up for our Daily Digest emails!

The genuine article 

Genuine champagne only comes from the Champagne region of France so make sure you correctly identify your OWN sparkling wine appropriately. Unless you live in the Champagne region of France I guess, but if you do you probably have better options than making your own. 

Back to top

Features

Buy This & Receive...
(1) - Brooklyn Brew Shop Sparkling Wine Gift Pack

Visit the Brooklyn Brewshop website

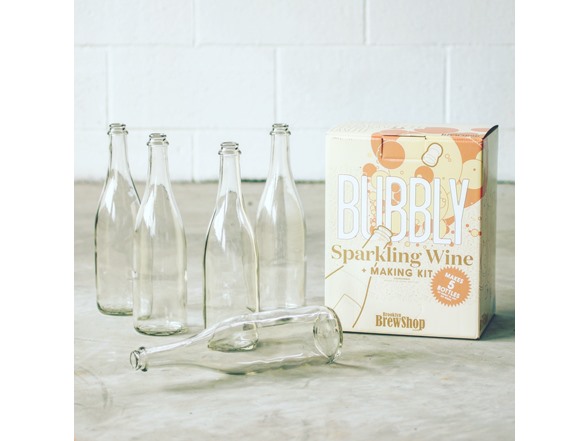
Bubbly Sparkling Wine Kit

Sipping bubbly makes us happy. It’s how we know we’re celebrating. Whether it’s champagne, cava, prosecco, or something else entirely, popping a cork and filling our flutes with something light and extra fizzy marks the start of a fantastic evening (or brunch) every time without fail. 

 
The steps to making your own delightfully sparkling wine are surprisingly easy. All you need is this kit, a few empty champagne bottles to reuse and a bit of time patience. Inside you’ll find all the equipment (even corks) and ingredients to make 5 bottles( bottles included) of sparkling wine including specially sourced chardonnay grape juice from a premiere vineyard. The equipment’s reusable. All you’ll need for future batches is another round of ingredients. 
 
So throw a party. Have some fun. Make some bubbly, and share it with friends (or make some new ones).
 

Inside the box:

  • 1 Gallon Fermentation Jug
  • Racking Cane
  • Tubing Clamp
  • Airlock
  • Tubing
  • Screw Cap Stopper
  • Hydrometer
  • 5 Plastic Corks
  • 5 Metal Cages
  • Wine Grape Juice
  • Cuvée Yeast
  • Yeast Nutrient
  • Sanitizer
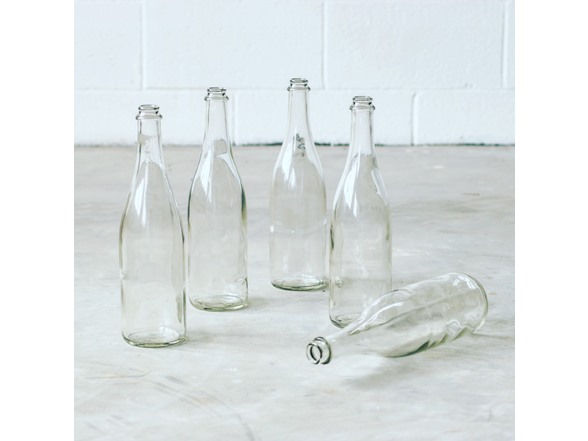
  • 5 Sparkling Wine Bottles


Special Note: While we work to ensure that product information is correct, on occasion manufacturers may alter their ingredient lists. Actual product packaging and materials may contain more and/or different information than that shown on our Web site. We recommend that you do not solely rely on the information presented and that you always read labels, warnings, and directions before using or consuming a product. For additional information about a product, please contact the manufacturer. Content on this site is for reference purposes and is not intended to substitute for advice given by a physician, pharmacist, or other licensed health-care professional. You should not use this information as self-diagnosis or for treating a health problem or disease. Contact your health-care provider immediately if you suspect that you have a medical problem. Information and statements regarding dietary supplements have not been evaluated by the Food and Drug Administration and are not intended to diagnose, treat, cure, or prevent any disease or health condition. Woot Services LLC and Woot LLC assume no liability for inaccuracies or misstatements about products.


Specs

Brewing Instructions

Recommended Equipment:

  • Funnel (helpful)

Additional Ingredients Needed:

  • 7 Tablespoons Sugar

Pre-Brew: Sanitize
Sanitization is important, but it's nothing scary. When brewing, keep everything clean so that you give what you're brewing its best chance to succeed. So when preparing for brew day, wipe any crumbs off the counters. Move any clutter that might be in your way. Read through the rest of the instructions (at least through fermentation) so that you know what to expect. And have fun!

  1. Dissolve half of your sanitizer packet with a gallon of water in a container. Save the second half for when you bottle.
  2. Soak everything you are going to use, rinse with water, and let air dry on some paper towels. If it isn’t totally dry when you are ready to start don’t worry.
  3. Keep the extra sanitizer in a container for now. Chances are you’ll want to re-sanitize something later.

1: Fermentation

This is when your Cider actually becomes alcoholic. During Fermentation, your jugs should sit somewhere out of the way (and out of direct sunlight) while ale yeast turns sugar into alcohol.

  1. Place funnel in the mouth of the fermentation jug and pour your room temperature chardonnay juice in the fermenter. Top up with water until the juice is at the one gallon mark and shake the fermenter gently to make sure the juice and water are mixed.
  2. You want to take a sample for your hydrometer to measure the gravity of your juice. Sanitize your racking cane and dip it into the juice. Once it is in the juice, put your thumb over the top end to create suction. Keep your thumb firmly over the top and take your racking cane out. Empty the juice you’ve collected into the plastic hydrometer case. You can also do this step with a sanitized turkey baster if you have one.
  3. “Pitch” yeast. (Toss the whole packet in.)
  4. Add in your yeast nutrient.  Its the small packet of white crystals.
  5. Shake aggressively. You’re basically waking up the yeast and getting more air into the juice.
  6. Attach sanitized screw-top stopper to bottle. Slide rubber tubing no more than 1” (2.5 cm) into the stopper and place the other end in small bowl of sanitizer. You’ve just made a “blow-off tube”. It allows CO2 to escape.
  7. Let sit for two or three days or until vigorous bubbling subsides. This is when fermentation is highest. You may notice bubbles and foam at the top of the wine. After bubbling calms down, clean tubing and ready your airlock.
  8. Sanitize, then re-assemble airlock, filling up to line with sanitizer.
  9. Insert airlock into hole in stopper.
  10. Keep at room temperature for 10 days without disturbing other than to show off to friends. (If wine is still bubbling, leave sitting until it stops.)
  11. In the meantime, drink sparkling wine with cork tops, or ask for empty bottles at a bar that has some.  Be sure to collect thick walled bottled.  Regular wine bottles won’t be able to withstand carbonation.
  12. 10 days after adding your yeast check that all bubbling has stopped in your fermenter.  If it has, take a gravity reading with your hydrometer.  If the reading is below 1.000 then you are all set to bottle.  If the reading is above 1.000 you want to give your wine 1-2 more days to finish fermenting then take another reading to confirm it has finished.

3: Bottling (2 Weeks Later)

  1. Thoroughly rinse bottles with water, removing any sediment.
  2. Mix remaining sanitizer with water.
  3. Fill each bottle with a little sanitizer and shake. Empty after two minutes, rinse with cold water and dry upside down.
  4. Dissolve 7 tablespoons sugar with 1/2 cup water. Pour into a sanitized pot. You will be siphoning your wine into the same pot in the next steps.
  5. Siphoning (It all happens pretty fast. You may want to practice on a pot of water a few times.) To see it in action first, watch the How to Bottle video at brooklynbrewshop.com/instructions.
    • A. Attach open tubing clamp to tubing.
    • B. Fill tubing with sanitizer.
    • C. Attach sanitized tubing to the short curved end of your sanitized racking cane. Attach the black tip to the other end - it will help prevent sediment from getting sucked up. It will probably be a snug fit, but you can get it on there.
    • D. Pinch tubing clamp closed.
    • E. Remove screw-cap stopper and place racking cane into jug, just above the sediment at the bottom (“trub”).
    • F. Lower end of tubing not connected to racking cane into sink. Suction will force beer up and through the racking cane and tubing. Open tubing clamp, let sanitizer flow into sink until beer just starts to flow out of the tubing, then clamp shut. Open clamp on tubing, allowing beer to flow into pot with sugar solution. Tilt jug when beer level is getting low, but be careful in not sucking up the trub.
  6. Siphon wine from pot into bottles, pinching tube clamp to stop flow after each bottle.
  7. Sanitize corks and press them into the top of each bottle until they fit tightly
  8. Wrap wire cages around top of each cork and tighten with metal twist
  9. Store undisturbed at room temperature for 4-10 weeks.

3: Enjoy (4-10 Weeks Later)

You did it! You made Sparkling Wine.

  • Sparkling wine can be drunk in as little as one month but will improve over time.  Its fun to stagger opening your bottles so you can compare!
  • Put your bottles of sparkling wine in the fridge the night before you drink them.
  • Drink. Share with friends if you’re the sharing type.


Vendor Details

Brooklyn Brew Shop

We started the Brooklyn Brew Shop out of the Brooklyn Flea in the summer of 2009 to get space-strapped New Yorkers brewing. With the idea that making beer (real beer from real ingredients) can be simple, tasty, and most important, fun, we created stylish, easy-to-use Beer Making Kits designed especially for stove-top brewing and ingredient mixes for seasonally inspired beers. Our goal is to get everyone brewing by simplifying the beer making process without dumbing it down.
 
Erica Shea and Stephen Valand are the owners and founders of Brooklyn Brew Shop, which has been featured in The New York Times, Food & Wine, Real Simple, New York Magazine, The Wall Street Journal, and Live with Regis & Kelly. Erica and Stephen have been named to Forbes 30 Under 30 and have appeared on BrewDogs, The Cooking Channel, Fox Business, and ABC News. As beer authorities, the couple has taught classes for Etsy, Stone Barns Center, Beer Bloggers Conference, South by Southwest Interactive, and the American Museum of Natural History and served as lecturers and judges for beer making contests.

Sales Stats

Speed to First Woot:
33m 1.448s

Purchaser Experience

  • 0% first woot
  • 6% second woot
  • 16% < 10 woots
  • 16% < 25 woots
  • 62% ≥ 25 woots

Purchaser Seniority

  • 0% joined today
  • 0% one week old
  • 0% one month old
  • 6% one year old
  • 94% > one year old

Quantity Breakdown

  • 91% bought 1
  • 9% bought 2
  • 0% bought 3 or more

Percentage of Sales Per Hour

6%
3%
0%
0%
6%
0%
0%
9%
9%
9%
3%
6%
0%
3%
0%
6%
3%
6%
3%
3%
3%
6%
9%
3%
12 1 2 3 4 5 6 7 8 9 10 11 12 1 2 3 4 5 6 7 8 9 10 11

Woots by State

zero wooters wootinglots of wooters wooting
Brooklyn Brew Shop Sparkling Wine Kit
$52.99 Sold Out Food, Beverages & Tobacco
$52.99 USD false 1 Retail EA
1 10